OOTD: School and Baking

IMG_1023

IMG_1024

shirt: American Eagle

skirt: thrift store

I loved the simplicity of this outfit! Tier skirts are a new favorite of mine and it seems like there are quite a few at my local thrift store. Oh yeah, and by the way, I wore this about a week ago and never got to posting it. Sorry about that! 🙂

blog signature

Honey Wheat Bread Recipe (no yeast needed!)

Lately I have been in a baking mood of sorts! In the past two days I have made some delicious, homemade, from-scratch, vanilla pudding and a nice loaf of honey wheat bread. I think this baking craze came along after seeing a pin on Pinterest (no surprise there- haha!) of a beautiful loaf of bread.

Now, I’ll admit my bread didn’t look like any artisan loaf, but I’d say it was pretty good for my first try. Alright, enough rambling… let’s get to the recipe.

IMG_1072


Honey Wheat Bread

yields one (1) loaf

Ingredients:

  • 3 cups – flour (all-purpose)
  • 4 tsp – baking powder
  • 1 tsp – salt
  • 1 1/2 cups – water
  • 1/4 cup – olive oil or vegetable oil
  • amount is to your discretion (I didn’t really measure this ingredient) – honey

Directions:

  1. Mix all dry ingredients in a large mixing bowl
  2. Add water
  3. Add olive/vegetable oil (try to spread this around the measuring cup so the honey won’t stick to the cup).
  4. Add honey.
  5. Mix until there is not dry flour left in the dough (it may be sticky- this is okay).
  6. Begin to knead bread (it helps to imagine you are a pizza maker 🙂 ). While you do this continue to add more flour, this should help make it not so sticky.
  7. Leave in bowl and cover for 1 hour to let rise.
  8. Knead some more.
  9. Once again, cover bread and let rise for 20 minutes.
  10. Bake for 40 minutes at 400°F.
  11. Serve (tastes good with apple butter, butter, or extra honey).

blog signature

Homemaking Binder: Tips and Tricks

binderpinnableimage

Yesterday I realized that the possibility of marriage is not far off. Then, it hit me – I know nothing about keeping a home, raising children, financing a home, or any of the other tasks that accompany adulthood.

So, today I found an old binder and some dividers and (like usual) turned to Pinterest for some ideas. I can across a post about making a homemaking binder for girls. Now, I feel like this binder was targeted towards girls ages 9-12. I am, however, 15 years old. I decided to take things a step further and look at ideas for homemaking binders (for adults). After looking around at a couple of different suggestions, I decided to make the following tabs in my binder:

  • Schedules – to do lists; weekly plans; goals for the day
  • Bible study ideas – future memory verses; daily reading; copies of favorite verses (ex. characteristics of a Proverbs 31 woman)
  • Blogging – future post/project ideas; keeping up with scheduled/drafted posts
  • Cleaning – tips and routines I come across online (ex. 10 steps to a clean bathroom)
  • “The Future” – basically where I put things that seem like they will be useful when I become a mother/home owner/wife/etc. (ex. age-appropriate chores for children)

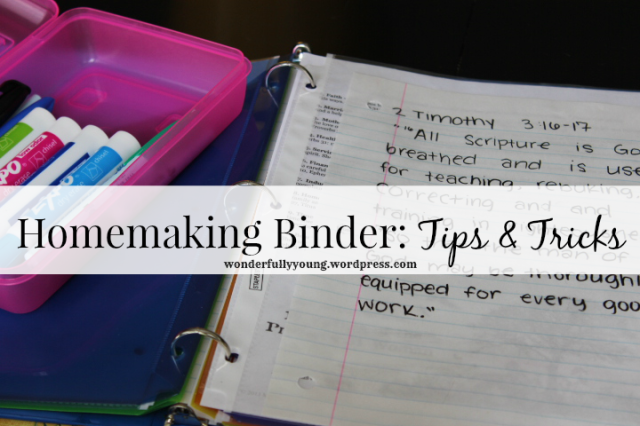
I wanted to save paper when I used my binder so I put each printable in a page protector. At first I was using dry erase markers, but I found they would erase after rubbing on the page in front of them. Yesterday, I was at the store and I bought some “wet erase markers.” This type of marker only erases when it is wiped off with a wet paper towel, so my writing doesn’t wipe off on the other pages.

Good luck on making your own binder!

blog signature